Tuesday, March 20, 2012

Cookies n Cream Ice Cream

C3 ed rc

C1 ed rc

C2 ed rc

As much as I love Seattle weather (I'm a sucker for pouring rain and snuggling up indoors), I'm looking forward to this Spring and Summer.  I know a lot of that has to do with a little certain someone due at the end of May, but I'm also enjoying the lighting at night to snap photos of my latest kitchen adventures.

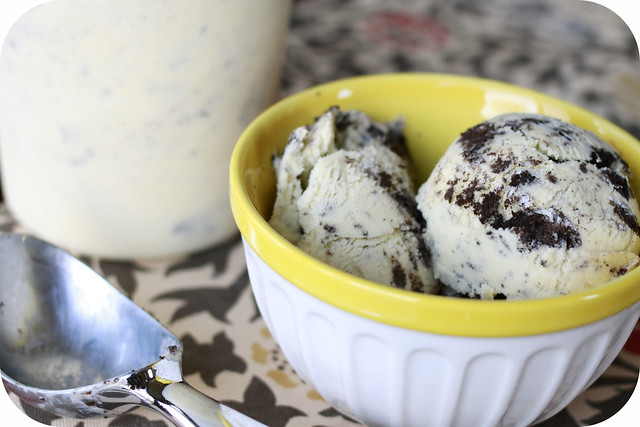
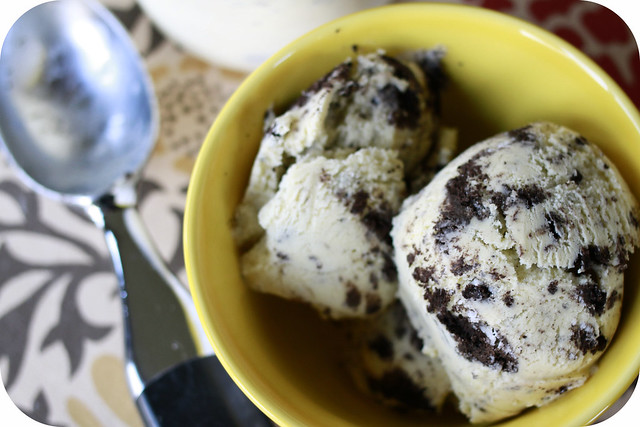
Last night I decided to make this Cookies n Cream Ice Cream recipe.  Kyle is a sucker for Oreos (loves them!) so I knew he would be excited to try this recipe.  The only bad thing about making ice cream is you have to be patient, it's definitely a process.  It's like baking bread.  The actual time spent preparing the dish isn't that long, but the time to consumption is usually a couple of hours.  With ice cream you really need to let it ripen in the freezer. 

Well Kyle and I were not patient and decided to test the ice cream out in its soft-frozen state last night (and don't get me wrong, it tasted great), but it tasted much better (and more like the consistency you expect from ice cream) today. 

This bowl of ice cream may or may not have been sacrificed before dinner, ahem.

I had a full night of cooking last night (three separate entrees, some granola, ice cream, and a breakfast casserole (I know!)), but tonight I plan to take it easy.  I'm going to grill some burgers, bake homemade potato wedges, and try my luck at some garbanzo chips using a recipe I received at Whole Foods on Saturday when I bought a large bag of dried beans from a local farmer.

Cookies n Cream Ice Cream
Makes about 1.5 pints

Ingredients:

1 cup whole milk
2 cups heavy whipping cream
6 egg yolks
1/2 cup sugar
1 Tbsp. vanilla extract
15-20 Oreo cookies, coarsely chopped

Directions:

Combine the milk and cream in a saucepan over medium heat.  Heat until bubbles form around the edges.  In a medium bowl, whisk together the egg yolks and sugar until smooth and well combined. Slowly add the warm milk mixture to the egg yolk mixture, whisking constantly to prevent curdling.

Pour the mixture back into the saucepan.  Cook over medium heat, stirring constantly, about 5-8 minutes, until the mixture is thickened and coats the back of a spoon (about 175 degrees F on an instant read thermometer).  Pour the liquid through a fine mesh sieve into a bowl.  Stir in the vanilla extract.  Cover with plastic wrap and chill in the refrigerator until completely chilled.

Once the mixture is well chilled, pour into an ice cream maker and freeze according to the manufacturer’s instructions (I use the Kitchen Aid attachment and it took about 25 minutes).  Once the mixture is softly frozen, transfer half of it to a storage container.  Add half of the chopped Oreo pieces and fold in gently with a rubber spatula.  Add the remaining ice cream and Oreo pieces to the container, and fold once more until the mixture is evenly combined.  Freeze until completely hardened.

Source: Annie's Eats 

Friday, March 16, 2012

Thick and Chewy Chocolate Chip Cookies

This past week I've made a couple of batches of these cookies (they are seriously that good!).  I was a little surprised at how much dough you put on the cookie sheet, but they flatten out nicely and are super moist.  They almost look undercooked when you pull them out of the oven, but let them cool and they will hold their shape.

Typically I like to cook a few then freeze the rest.  You'll need to flash freeze the dough to keep them from sticking.  Just place the rolled dough on some parchment paper on a cookie sheet and let them freeze for 20 minutes.  After 20 minutes transfer them to a Ziploc bag.  If you plan to cook these straight from the freezer you'll need to add 2-3 minutes to the cooking time (give or take), just make sure to watch them.

Enjoy-
CC ed rc

Thick and Chewy Chocolate Chip Cookies
Makes about 16 large cookies

Ingredients:

2 cups plus 2 Tbsp. all-purpose flour
1/2 tsp. baking soda
1/2 tsp. salt
12 Tbsp. unsalted butter, melted and cooled until warm
1 cup brown sugar, packed
1/2 cup granulated sugar
1 large egg plus 1 egg yolk
2 tsp. vanilla extract
1 1/2 cups semi-sweet chocolate chips

Directions:

Adjust oven racks to upper and lower-middle positions.  Preheat oven to 325 degrees F.  Line two cookie sheets with parchment paper.

Whisk dry ingredients together in a medium bowl; set aside.  With an electric mixer, or by hand, mix butter and sugars until thoroughly combined.  Beat in egg yolk, and vanilla until combined.  Add dry ingredients and beat at low-speed just until combined.  Stir in chocolate chips.

Roll a scant half-cup of dough into a ball.   Holding dough ball in fingertips of both hands, pull apart into two equal halves.   Rotate halves 90 degrees and, with jagged surfaces facing up, place formed dough onto cookie sheet, leaving ample room between each ball.   Bake, reversing position of cookie sheets halfway through baking, until cookies are light golden brown and outer edges start to harden yet centers are still soft and puffy (approximately 11-14 minutes).   Do not over bake.

Cool cookies on sheets until able to lift without breaking.   Transfer to a wire rack to cool.

Source: Annie's Eats

Monday, March 12, 2012

Chicken Gyros

CG ed rc
During my long freezer cooking/ prepping session a couple of weeks ago I prepared this Chicken Gyro recipe.  To make it freezer friendly, cook up the homemade pitas beforehand and wrap individually in plastic wrap.  Then, prepare the marinade and add the raw chicken.  Throw everything in the freezer and let it hang out until your craving some yummy Mediterranean food :)
The night before you want to make this dish, pull the raw chicken and cooked pitas from the freezer to thaw in the refrigerator.  Then follow the recipe to make the tzatiki sauce, cook the chicken, and assemble the gyros.
I really enjoyed this recipe.  I naturally like the creamy and fresh taste of tzatiki and once you make homemade pitas you will never go back!  They can be a little time consuming to make, but totally worth it if you double the batch and freeze them ahead of time.  I also like freezer recipes that use raw meat in a marinade because they are super quick to throw together.
Enjoy-

Chicken Gyros
Makes about 4-6 servings

Ingredients:

For the tzatziki:
16 oz. plain yogurt (not nonfat, if possible)
1/2 hothouse cucumber or 1 regular cucumber, peeled and seeded
2-3 cloves garlic, pressed through a garlic press (or finely minced)
1 tsp. white wine vinegar
Salt and pepper
Squeeze of fresh lemon juice
Extra virgin olive oil

For the chicken:
4 cloves garlic, smashed
Juice of 1 lemon
2 tsp. red wine vinegar
2 Tbsp. extra virgin olive oil
2 heaping Tbsp. plain yogurt
1 Tbsp. dried oregano
Salt and pepper
1 1/4 lbs. chicken pieces (I used boneless, skinless chicken breast halves, but thighs would also work great here)

To assemble:
Pita bread (I highly recommend making these homemade pitas, they are amazing!)
Fresh tomatoes, seeded and diced
Red onion, sliced thin

Directions:

To make the tzatziki sauce, strain yogurt using cheesecloth over a bowl.  Let strain for several hours or overnight, if possible, to remove as much moisture as possible.

Greek yogurt would also work nicely here.  I used the plain yogurt and didn't have time to strain, but it still worked just fine.

Shred the cucumber.  Wrap in a a towel and squeeze to remove as much water as possible.  Mix together the strained yogurt, shredded cucumber, garlic, white wine vinegar, salt and pepper to taste, and lemon juice.  Drizzle lightly with olive oil.  Refrigerate for at least 30 minutes before serving to allow the flavors to meld.

To prepare the chicken, combine the garlic, lemon juice, red wine vinegar, olive oil, yogurt, oregano, and salt and pepper to taste in a minimum bowl.  Whisk together until mixed well.  Add the chicken pieces to the bowl and mix well to coat.  Cover and refrigerate for about an hour. 

Cook the chicken as desired, either in the skillet or with the broiler.  Once the chicken is completely cooked through, transfer to a plate and let rest for 5 minutes.  Cut into strips.

 I pounded the breasts to flatten them slightly, cut them into strips, and then froze the whole mixture until I was ready. The night before I wanted to make this for dinner I pulled out the chicken to let thaw in the refrigerator. I decided to cook them under the broiler on high and it worked great.

Heat pitas to warm and top with chicken, tzatiki sauce, diced tomatoes, and sliced onions.  Serve immediately.

I misted the pitas with a little olive oil and warmed them slightly in the toaster (only a minute or two).

Source: Annie's Eats

Saturday, March 10, 2012

American French Toast

This morning I had to find an excuse to use some of the homemade American Sandwich Bread I made yesterday so I decided to pull out some cookbooks and look for a French toast recipe.  I typically make French toast the way my mom made it growing up where you whisk together a couple of eggs, some milk, splash of vanilla, and a dash or two of cinnamon.  It always tasted great, but I was looking for more of a custardy French toast recipe with some flavor other than cinnamon.

I ended up finding a recipe in one of my Williams Sonoma cookbooks with nutmeg and hint of orange zest.  I was a little worried that Kyle might not like the addition of citrus to the French toast, but we both really enjoyed it.  I also used to cook my French toast on an electric skillet sprayed with non-stick cooking spray, but now I plan to follow this technique of frying the slices in melted butter.  The flavor you get from the melted butter is wonderful and you don't have to worry about buttering your slices before adding syrup.

AF 4 ed rc

French Toast
Makes 3 or 4 servings

Ingredients:

6 slices of American Sandwich Bread
1 1/2 cups (12 fl oz/ 375 ml) 1% milk
4 large eggs
1 Tbsp vanilla extract
1/4 cup (2 oz/ 60 g) granulated sugar
1 tsp grated orange zest
1/4 tsp ground nutmeg
1/8 tsp salt
2 Tbsp unsalted butter
Confectioners' (icing) sugar for dusting
Pure maple syrup, warmed, for serving

Directions:

In a large baking dish, place the bread slices in a single layer.

In a large glass measuring pitcher, thoroughly whisk together the milk, eggs, vanilla, granulated sugar, orange zest, nutmeg, and salt.  Pour evenly over the bread and let stand for 1 minute, then turn the bread over and let stand for another minute.

In a large frying pan over medium heat, melt 1 Tbsp of the butter.  When the butter has foamed and the foam begins to subside, add as many slices of bread as will fit in the pan without overlapping (if you can use a frying pan that will fit 3 slices of bread).  When the slices are golden brown on the bottom, after about 1-2 minutes, carefully turn them over and cook until golden brown on the second side, about 1-2 minutes longer.  You may want to extend the cooking time slightly if you like a drier French toast.  Transfer the finished slices to a warmed platter in a 200 degree oven to keep warm.  Melt the remaining 1 Tbsp butter and repeat with the remaining bread slices.  Transfer the French toast to individual plates, dust the tops with confectioners' sugar, and serve at once, with warm maple syrup.

I found that the bread slices browned quickly over medium heat so definitely keep an eye on it and turn down the heat slightly if needed.

Source: Adapated from The Williams-Sonoma Cookbook: The Essential Recipe Collection for Today's Home Cook 

Friday, March 9, 2012

Homemade Sandwich Bread

A week ago I discovered this wonderful food blog, Annie's Eats, on Pinterest.  My friend Cammie pinned her post on freezer meals and I was hooked!  I've been trying to find recipes other than casseroles to prepare before baby Autumn arrives in late May.  Well needless to say I ended up spending 5 hours last Thursday preparing freezer meals.  I decided to start with her Chicken Gyros, Whole Wheat Pita Bread, The Perfect Hamburger, The Perfect Burger Bun, and White Bean Chicken Chili

All the work was well worth it, but being pregnant and on my feet in the kitchen after work was not good for my back.  In the future I plan to double and triple recipes rather than make multiple recipes all at once. 

So far I've tried the White Bean Chicken Chili and the Perfect Hamburger (with Perfect Bun).  Both of them were great, especially the Perfect Bun (which is a light brioche bun).  I also really enjoyed packing the chili for lunch this week, but Kyle thought it resembled too much of a soup (he's not really a soup guy).  I didn't mind the consistency, but in the future I will probably double the amount of beans.

Anyways, I digress.  This post is about some homemade American Sandwich Bread.  Ever since making the buns and pitas I'm now on a bread/roll/bun making kick.  You just can't beat the taste and satisfaction of homemade bread.

I was drawn to this particular recipe because I had all of the ingredients on hand.  It came together rather quickly and I LOVE that the dough cooperated with me.  I typically find bread recipes a challenge because the dough is either too sticky or too dry, but with the purchase of a kitchen scale that has all changed.  I weighed the amount of all purpose flour and didn't need to follow the extra step of adding flour after the 10 minute knead process in the mixer.

I will definitely be making this bread again and I plan to store the slices in the freezer for a quick sandwich, grilled cheese, or some toast (if it's not all gone by Sunday!).


American Sandwich Bread-1

American Sandwich Bread-2

American Sandwich Bread-3

American Sandwich Bread
Makes 1 loaf
Approximate cook time is 2 hours and 15 minutes (includes prep, rise, and bake time)

Ingredients:

3 ¾ cups all-purpose flour (18 ¾ oz.)
2 tsp. salt
1 cup warm whole milk (about 110°)
1/3 cup warm water (about 110°)
2 tbsp. unsalted butter, melted
3 tbsp. honey
1 envelope (about 2 ¼ tsp.) instant yeast

Directions:
Adjust an oven rack to the lowest position and heat the oven to 200°.  Once the oven temperature reaches 200°, maintain the heat for 10 minutes, then turn off the oven.
Mix 3 ½ cups of the flour and the salt in the bowl of a stand mixer fitted with the dough hook.  Mix the milk, water, butter, honey and yeast in a liquid measuring cup. Turn the machine to low and slowly add the liquid. When the dough comes together, increase the speed to medium and mix until the dough is smooth and satiny, stopping the machine two or three times to scrape dough from the hook, if necessary, about 10 minutes. (After 5 minutes of kneading, if the dough is still sticking to the sides of the bowl, add flour 1 tablespoon at a time and up to ¼ cup total, until the dough is no longer sticky.) Turn the dough onto a lightly floured work surface; knead to form a smooth, round ball, about 15 seconds.

Please note that a medium mixing speed in your stand mixer will sound pretty violent.  After 5 minutes of running I heard a loud thump and the mixer actually fell on the floor (I know!).  The mixer was close to the edge of the counter, but my recommendation is to push as far back as possible.  I also decreased the speed for the last 5 minutes down to medium-low and the bread still tasted fantastic.

Place the dough in a very lightly oiled large bowl, rubbing the dough around the bowl to coat lightly. Cover the bowl with plastic wrap and place in the warmed oven until the dough has doubled in size, about 40-50 minutes.
On a floured work surface, gently press the dough into a rectangle 1 inch thick and no longer than 9 inches. With a long side facing you, roll the dough firmly into a cylinder, pressing with your fingers to make sure the dough sticks to itself. Turn the dough seam-side up and pinch it closed. Place the dough seam-side down in a greased 9×5-inch loaf pan and press it gently so it touches all four sides of the pan. Cover with plastic wrap; set aside in a warm spot until the dough almost doubles in size, 20-30 minutes.
Keep one oven rack at the lowest position and place the other at the middle position and heat the oven to 350°. Place an empty baking pan on the bottom rack. Bring two cups of water to boil in a small saucepan. Pour the boiling water into the empty pan on the bottom rack and set the loaf onto the middle rack. Bake until an instant-read thermometer inserted at an angle from the short end just above the pan rim into the center of the loaf reads 195°, 40-50 minutes. Remove the bread from the pan, transfer to a wire rack and cool to room temperature. Slice and serve.

Source: Annie's Eats, originally from Baking Illustrated