Saturday, September 25, 2010

Buffalo Chicken Panini

Kyle and I were both starving tonight and I had no idea what I was going to make for dinner.  I didn't feel like making anything an almost opted for Chinese delivery or pizza delivery or anything delivery for that matter.  Luckily, I came to my senses and decided to make this Buffalo Chicken Panini from the October 2010 issue of Cooking Light.  Kyle had mentioned wanting something spicy so this was the perfect meal.  It also rolls in at 402 calories per sandwich which is even better. 
My only recommendation is to add more hot sauce (if you like it spicy).  The amount in the recipe gave it the buffalo wing taste, but didn't have any heat.

Buffalo Chicken Panini
Cooking Light, October 2010 Issue, pg. 206
1/4 cup hot pepper sauce, divided
1 pound chicken breast tenders
1/2 cup (2 ounces) crumbled blue cheese
6 tablespoons canola mayonnaise
8 (1-ounce) slices white our sourdough bread
Directions: Preheat broiler; coat broiler pan with cooking spray.  Combine 2 tablespoons hot sauce and chicken in a medium bowl , tossing to coat.  Arrange chicken in a single layer on broiler pan; broil 4 minutes on each side or until done.  Place chicken in a bowl; toss with remaining 2 tablespoons sauce.  Combine cheese and mayonnaise.  Spread 3 tablespoons cheese mixture on each of 4 bread slices; top each with one-forth of the cooked chicken and 1 bread slice.  Heat a grill pan over medium-high heat.  Coat pan with cooking spray.  Arrange two sandwiches in pan.  Place a cast-iron or heavy skillet on top of the sandwiches, press gently.  Cook for 3 minutes on each side or until bread is toasted (leave skillet on sandwiches while they cook).  Repeat procedure with remaining 2 sandwiches.  Yield: 4 servings (serving size: 1 sandwich).
Nutrition Info:
Calories: 402
Fat: 16.2g (sat 4.9g, mono 6g, poly 3.5g)
Protein: 32.4g
Carb: 29.1g
Fiber: 3g
Chol: 75mg
Iron: 0.8mg
Sodium: 724mg
Calcium: 100mg

Thursday, September 23, 2010

Loaded Potato Soup

In the October 2010 issue of Cooking Light I stumbled on this recipe for Loaded Potato Soup.  I was instantly intrigued with this "healthy" soup that had cheese and bacon nestled on top (yum! I love bacon).  I was surprised to find that 1 1/4 cups of this soup is only 325 calories.  It's the perfect amount for a light meal, especially if you serve it with some chicken breast and a salad.

I decided to make it the following day for dinner and let's just say it got RAVE reviews from my husband.  I also really enjoyed it.  Kyle said it makes him feel like taking a nap.  I say it makes me feel like curling up in front of the fireplace to watch a movie on a cold night.  Did I mention I'm excited for Fall?

Another bonus is that it only takes about 30 minutes to make and it's a fairly simple recipe.  If you try this out please let me know.  It tastes like a super delicious loaded baked potato, but has all the goodness a hot cup of soup can provide.  Did I mention it has bacon? ;)

Loaded Potato Soup
Cooking Light, October 2010 Issue, pg. 42

4 (6-ounce) red potatoes
2 teaspoons olive oil
1/2 cup prechopped onion
1 1/4 cups fat-free, lower-sodium chicken broth
3 tablespoons flour
2 cups 1% low-fat milk, divided
1/4 cup reduced-fat sour cream
1/2 teaspoon salt
1/4 teaspoon pepper
3 bacon slices, halved
1/3 cups shredded cheddar cheese
4 teaspoons thinly sliced green onions

1. Pierce potatoes with a fork (no need to wash).  Microwave on HIGH 13 minutes or until tender.  Cut in half; cool slightly.
2. While potatoes cook, heat oil in a saucepan over medium-high heat.  Add onion; saute 3 minutes.  Add broth.  Combine flour and 1/2 cup milk; add to pan with 1 1/2 cups milk.  Bring to a boil; stir often.  Cook 1 minute.  Remove from heat; stir in sour cream, salt, and pepper.
3. Arrange bacon on a paper towel on a microwave-safe plate.  Cover with a paper towel; microwave on HIGH for 4 minutes.  Crumble bacon.
4. Discard potato skins.  Coarsely mash potatoes into soup.  Top with cheese, green onions, and bacon.

Yield: 4 servings (serving size: about 1 1/4 cups)

Nutrition Info:

Calories: 325
Fat: 11.1g (sat 5.2g, mono 4.5g, poly 0.8g)
Protein: 13.2g
Carb: 43.8g
Fiber: 3g
Chol: 27mg
Iron: 1.3mg
Sodium: 670mg
Calcium: 261mg

Recommendations:
~Watch the milk mixture carefully!! When it starts to boil, if it gets too hot it may boil over your saucepan (if it's not big enough) before the 1 minute mark.
~Make a double batch.  Although 325 calories is great per serving, if you don't pair it with a protein and side vegetable you may still be hungry.  Doubling the batch will ensure there is plenty to go around (just make sure you watch the calories, you know, if you're watching that kind of thing!)
~Freeze it! The night before you want to have it for dinner, pull it out of the freezer and stick it in the fridge.
~For you photographers out there... I watched a video at Fro Knows Best that talked about using flash and how to make your images look less flat.  I'm always stuck with the problem of photographing food at night during the winter, so this was a great tip!  Instead of keeping your DSLR on auto and using the pop up flash, change it to Shutter priority and decrease your shutter speed to 1/10 or 1/8 (instead of 1/100 or 1/200 that auto typically chooses).  Then, while keeping your flash popped, take the picture.  The flash with freeze whatever you're taking a picture of while leaving the shutter open to account for the ambient light (see the yellow light in the background of my photo from the overhead kitchen lights?).  I tested it out this morning when I had poor lighting and I was happy with the results!  Thanks Fro!

Sunday, August 22, 2010

Tiramisu Cupcakes

I've been on quite the cupcake baking spree this last week!  Danielle, a friend of mine, is turning 30 this week so we decided to throw a birthday party for her.  We went with an Italian theme for dinner so I recommended making Italian sodas and I brought Tiramisu cupcakes.

This is a Martha Stewart recipe out of the Martha Stewart Cupcakes cookbook.  I'm never disappointed with a Martha Stewart recipe ~ everyone who tried these cupcakes (the girls at the party, my friends husband, Kyle, my in-laws, and my friend Lindsay) all loved them.  They have a rich coffee flavor and the mascarpone frosting is delicious.  The recipe was also simple to make (but does call for some special ingredients like a vanilla bean, mascarpone cheese, and marsala wine for the coffee-marsala sauce that gets basted over the top). 

If you're going to have an Italian-themed party, or if you just love Tiramisu, I recommend giving this recipe a try.


To check out this recipe, click here (will take you to the recipe on Martha's website).

Enjoy!

Friday, August 20, 2010

German Chocolate Cupcakes

I decided to make Martha Stewart's German Chocolate cupcakes for my dad's birthday last week.  This is hands down his favorite cake.  Last year I made him a three layered German Chocolate cake from scratch.  It was my first time ever making a layered cake and I've got to say, it was quite fun!  I went to go find a link to the cake on my blog and realized that was one recipe I never found time to blog (how lame).  Here is a picture I found to give you and idea of what I made:


(next time I'll try to get a picture with a slice missing that way you can see all of the layers)

These cupcakes were fairly simple to make and tasted d.e.l.i.c.i.o.u.s.  Everyone in my family who tried them thought they were pretty good (at least, that's what they told me!).  I love how they look like a mini two-layered cake. 


If you like coconut and pecans - you seriously need to give this recipe a try.  Your tummy will thank you for it.

The recipe can be found on the Martha Stewart website here.

Happy cupcake baking, photographing, blogging, and eating (the best part)!

Wednesday, July 21, 2010

Garvey's Organic Traditional Scones

When I was at QFC the other day I decided to look at the scone mixes.  I've only made scones from scratch once and was wondering what the box mixes were like.  I decided to pick up Garvey's Organic Traditional Scones - it cost around $3.50. 

Last night I had a friend over for tea and scones.  She is super picky with box mixes (because they usually don't taste as good as homemade) so I wanted to see what she thought about the mix I picked up.  I ended up making the lemon variation and let me tell you we both thought they were delicious!  They were simple to make and came out of the oven golden brown and flaky (what more could you ask for?!).


Doesn't it look scrumptious?

Saturday, July 17, 2010

Quick Coconut Ice Cream


I can't believe it's already mid-July and I've only made one homemade ice cream recipe!!  I've had my ice cream maker attachment (for the KitchenAid mixer) since Christmas and the only ice cream I've made is the Double Chocolate Mint Chip (it was also healthy).  This was the first ice cream recipe I made that called for heavy cream and let me tell you, it was deliciousIt was also super easy to make!

I was craving a cool, coconut treat so I searched for coconut ice cream recipes.  I stumbled across a lot of recipes that called for a list of around 10 ingredients of which one of the ingredients was coconut cream (not coconut milk).  Does anyone know where to find this??  I wasn't in the mood to search for specialty food items so I kept looking.  I then came across this site.  I was instantly excited for the recipe because it calls for four ingredients!  I left out the saffron, but I'm sure it adds a really great touch to it (like I said... wasn't in the mood for finding specialty items).  This coconut ice cream I made calls for three ingredients: heavy cream, unsweetened coconut milk, and granulated sugar.

I hope you give this recipe a try, it is delicious!  You could really fancy it up and serve on top of some sort of cookie, shortbread, cake, etc. and top with toasted unsweetened flaked coconut.  Yum.

Quick Coconut Ice Cream Recipe
*adapted from Delicious Days

2/3 cup heavy cream
1 cup coconut milk (I used unsweetened)
1/4 cup granulated white sugar

In a medium saucepan, bring all ingredients to a boil (right when it starts to really boil it will look foamy and start to rise in the pan.  If you're not watching enough it may boil over so watch closely because when it really starts to go you need to go the next step).

Reduce heat (to about medium low, a 2.5 on my gas stove dial) and simmer gently for 10 minutes, stirring occasionally.  Remove from heat and chill the mixture thoroughly (I place the pan in a wooden bowl with ice to submerge it.  Then I stick the whole thing in the fridge.  This process usually cools the mixture in about 30 minutes.).

Once chilled, freeze in your ice cream maker according to the instructions (in the KitchenAid mixer it took approximately 20 minutes).

Some Tips/Notes:
-Make sure the ice cream maker attachment bowl is completely chilled and frozen prior to churning the ice cream (at least 12 hours).  I leave it in my freezer at all times so I can have ice cream quickly ;)
-Some ice creams require an additional "riping" period in the freezer.  This ice cream sets up really nicely in the churn process and is thick enough to scoop and eat right away.  If you freeze the ice cream after it does get harder and may require some time to soften gently prior to scooping.

Thursday, July 15, 2010

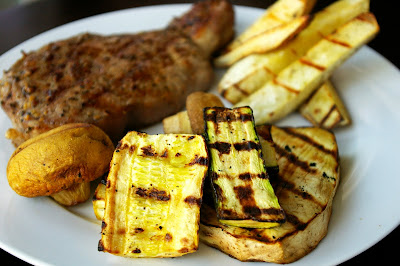
Grilled Goodness

I was in quite the grilling mood last night so on my way home from work I stopped by the store and picked up some steak, a sweet potato, yellow squash, zucchini, eggplant, and some white mushrooms. 

I simply drizzled all of the veggies in EVOO, salt, and pepper, and grilled over medium heat until soft.  This meal was so delicious!!

What have you been grilling??